Sharing is caring! Our dev blog is here to give you insights on how we work at Largelabs, the tech that we use and create as well as our art/tech pipeline. If you are a game developer, this is for you to read, comment and share 🙂
The beauty of B-Splines
This article contains details about the foundations of our Natural Roads system. If you haven’t read about it yet, please take a look at our first dev blog article : Natural Roads
A great solution for linear action games
When we started creating Natural Roads, we wanted a system that allowed us to create any type of linear action game. Our character / object needs to follow a path with a given speed. We also wanted the ability to design differents shapes for our paths (curves, hills)… and still have our character following the rail!
After investigating different options, we went for one called B-Spline. In this article, we will go through the basics of the implementation of B-Splines in Unity Engine, as it has been done for Natural Roads, and ultimately Escape, our first game that truly benefits from it.
What is a B-Spline?
B-Spline is a mathematical object that defines a curve (basically). Each B-Spline curve is composed of splines, a sub-curve (like a small curve portion). All splines connect to each other continiously. The continuity between successive splines inside a B-Spline curve is guaranteed mathematically. Therefore, there is not need to align your successive curves one after the other. This is done by a magical math formula 🙂 Pretty cool right?
How are B-Splines used in Escape?
In Escape, we have a road that is divided in “segments”, as defined in the Natural Roads system. Of course, the players dont see any separation between segments, nor their generation. We took care of that 😉
Segments are made with successive “sections” that are defined by a curve, hill, geometry… Basically, each segment is a B-Spline, for which each section is a spline!
You’re already lost? Then take a look at this. The screenshot below is a very (very, very) early prototype of Escape:
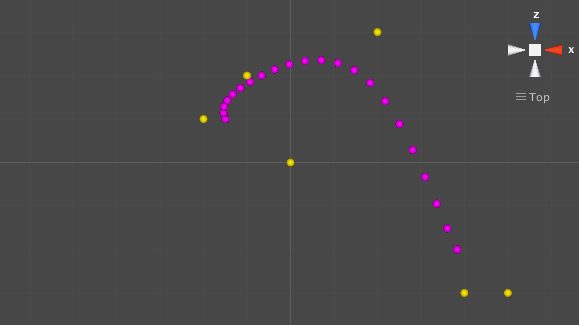
Not quite as fancy as the alpha demo we released recently, right? But yes, this was Escape, at the very beginning.
What you see is a B-Spline in a very raw form (in the final game we filter the vertices when we create it to optimize it and we adapt the number of vertices to the length of each spline).
All you need to know right now is that this B-Spline has 2 splines:
- A long and straight one
- A small curved one.
Both splines have the same number of vertices, which is why the second one looks very condensed. The magic here is that there is a perfect continuity between the splines. As we add splines, the path remains smooth with no extra effort!
This B-Spline will later become a “runnable” segment, after we built a mesh around it :
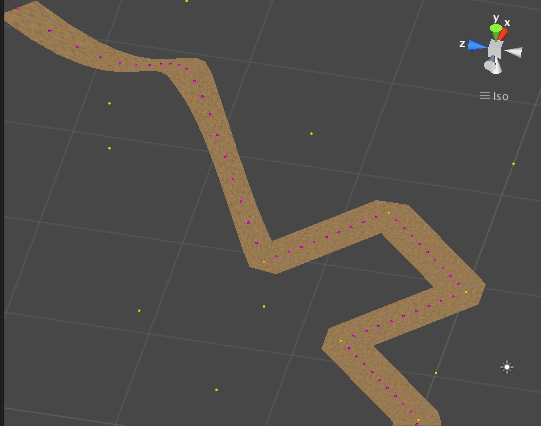
This is a very primitive mesh that was built around another B-Spline. It’s flat, it has only quads, but it follows the curve and gives it a certain “reality” in space.
But what really matters in the first place is getting this curve to work!
How do I get a curve?
As you understood by now, B-Spline is a mathematical object defined by an equation. A polynom, for those who still remember high school (sweet sweet memories). The equation gives the position of a vertex on the curve. It takes the following inputs:
- The spline index: a B-Spline has several splines as you know by now. Each spline is a curve within the big curve. When you calculate a position on the B-Spline curve, you need to know on which spline you are (a B-Spline that has 3 splines will have a 0,1,2 spline)
- 4 anchors per spline: these anchors are simple vertices that you place in your world. Their positions will set the geometry of the spline (a bit like the handles that you have for a Bezier curve, used for the animation curves in Unity or in the Photoshop pen tool). In the image above, the anchors are painted in a yellow sphere gizmo.
- A float between 0 and 1: this represents the percentage on the current spline for which you want to get the position.
“Ok, but what does that mean?!”
Time for an example!
I have a B-Spline that has 3 splines and I want to calculate a vertex that is exactly halfway on the second spline. What do I need ?
- The spline index : 1
- 4 anchors of the spline : I will get the anchors that were set for the spline of index 1
- A float between 0 and 1 : 0.5 since it’s halfway (we are at 50% of our spline)
I pass all this to my magical function:
Vector3 getBSplinePosition(float i_ratio, int i_splineIndex);
And I get my result in a Vector3! A position on the curve for these inputs…
To get the whole curve, we run the getPosition function with all the splines that will compose the curve (which means all our collections of 4 anchors) and several successive ratios (0.1f, 0.2f, 0.3f, 0.4f… 1.0f).
With a precision of 0.1f, you will get 10 vertices per spline. Your B-Spline with 3 splines will therefore have 30 vertices that you can print on screen. In the screenshots above, they are painted on screen with a magenta spherical gizmo.
“That doesn’t tell me how to get the position. What is inside this function?!”
The position equation implementation…
The screenshot below is our implementation of the B-Spline equation. This is the getPosition function from the example above:
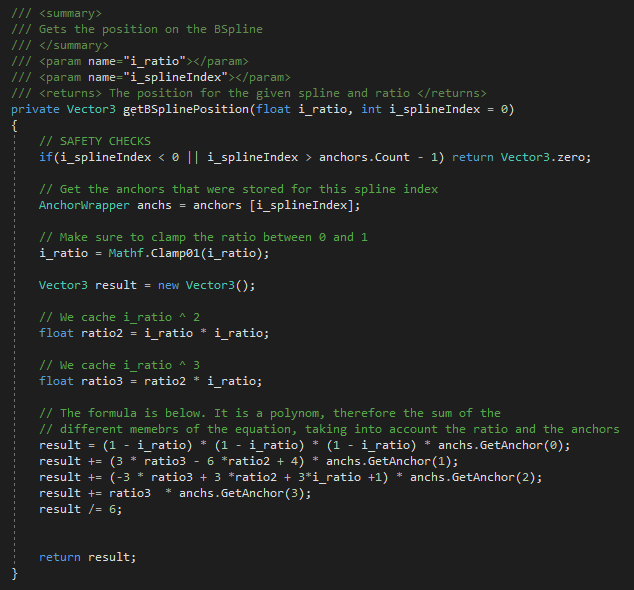
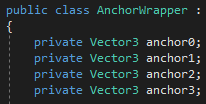
The AnchorWrapper is simply a little class that contains the anchors of a spline.
Creating the anchors
This is the crucial part. How do I place the anchors of my splines to get my curve with the shape I want? Well, I guess it’s really up to you! 😮
Lifting them upwards will create a hill. Moving them continuously to the right will curve the spline on the right, etc… <3
Following the path
Now that we can create paths, we need a game! With gameplay! And the first step is to make sure our character follows the path, since we are making a linear action game.
Well… Simply use the magic of B-Spline, with the getPosition function!
ratioCharacter += Time.deltaTime * speed;

if(ratioCharacter > 1f) {
   ratioCharacter = 0f;
   splineIndex++;
}

transform.position = myBSpline.getPosition(ratioCharacter,splineIndex);
And that’s it! You got yourself a prototype for a linear action game. The rest is up to you. There are so many great ways to use B-Splines. Getting it to work the first time opens a universe of possibilities (gameplay, camera control…)
Thanks for reading, and looking forward to seeing your prototypes!
Keep it Large.
The Largelabs Team.